


I am a big fan of Etsy banners with shop products. Here's the one I made for my spanking new supplies shop:

I like it! And it was pretty easy to make so I want to share. It will take about 30 mins to an hour. Here's what you need:
- Google Picasa It is free and available for Windows XP, Windows 7, Mac OS X 10.4.9+ (needs Intel processor). It's a great photo organizer and provide a bunch of simple tools for touch up.
- Product pictures. I am sure you have these right? It works best if you have some focal pictures like a up close picture of a bead.
- This template image in full size. Click on it. It'll open a new window. Save it.


You can click on all the pictures in this tutorial to see a full size screen shot.
Step 1: Pick your pictures and also select the template image I mentioned above. Just click on the ones you want. Ctrl-Click (Option-Click on Mac?) to select multiples. You will noticed that the ones you picked are stored in the tray in the lower left hand corner. If you are picking pictures from different directories, you have to "pin" them in the tray by clicking on the little green thumb tack. To unpin something, click on the picture you want to unpin and then the red circle button.

Step 2: Click on the Collage button in the bottom toolbar.

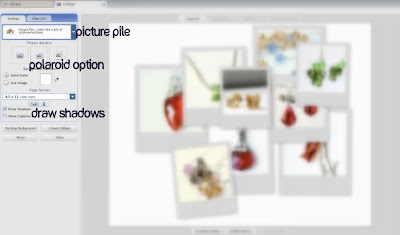
Step 3. In the left panel, select picture pile, the polaroid option for picture border (3rd icon) and make sure the draw shadows option is checked. You will end up with a pile of pictures that look like polaroids in your workspace.

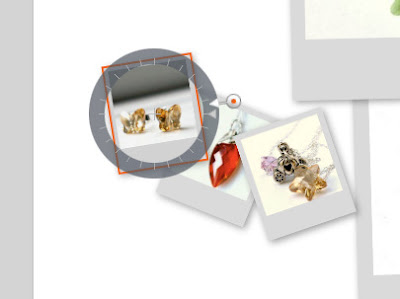
Step 4. Scale and arrange the pictures to line up horizontally. Just click on the image and it will pop up that gray circle with the little dot. You can rotate and scale using that.

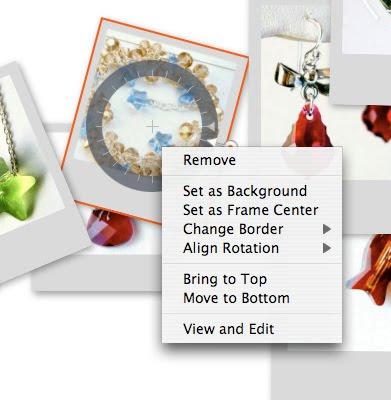
You can also right click on the image (Ctrl+click in Mac) to pop up a menu that will let you move the pictures to the top or bottom on the pile. Have fun with this. Rotate them around to get a "I just threw these pictures down" look. You may have some big white space in some of your pictures. Arrange them so that the big white space is covered by another picture.

Step 5: Scale the template image so that it's just about as wide as the workspace. Try to fit all your polaroids within the black lines. It's ok to have a little bit of the pictures be outside the black line. That will just look like the pictures are being cut off. Depending on your taste, you may or may not want that. If you want to put your shop name or other text in the banner, leave that space open.

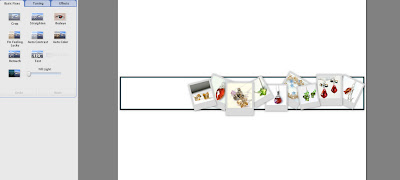
Step 6: Create Collage. Once you are happy with the way the pictures are lined up, click on Create Collage. This takes a few minutes. Then, you'll end up with an image that you can edit like any other pictures inside Picasa. Your screen will look something like this:

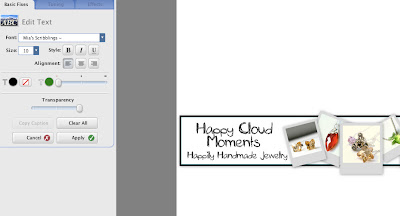
Step 7: Add Text. You don't have to add anything. But, if you want to, click on the "Text" button and your screen will look like the following screenshot. Then, just click where you want to put the text and start typing. You can resize and rotate the text like you did with the images. You can also change the font, color and thickness of the text using the left panel. When you are done. Click Apply.

Step 8: Crop. Now you need to crop the image so that you don't see any black border. Of course, if you like the border, you can keep the border. Click on "Crop" and drag a box around the area you want to keep. Click Apply when you are done. If you think you missed by a pixel or something, you can also click on Crop again to recrop it.

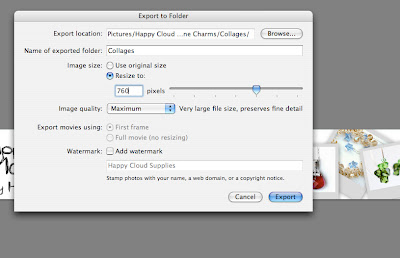
Step 9: Export to the right size. Etsy banners are supposed to be 760 pixels wide and 100 pixels high. So, click on File --> Export. In the export window, pick the place where you want to save the image and set the size 760 for the width. Hit Export and voila. You just finished making your banner!

Step 7b (Advanced version): Put in your logo If you want to put your logo instead of just text, you can stop at Step 6. Just export that out, import it into your favorite image editor like Photoshop and layer your logo on top. Or you can be lazy like me and do a Ctrl+Command+Shift+4, and grab the screenshot into the clipboard. Then, just paste it into Photoshop and have my way with it. Sorry that's a Mac shortcut only. And that's why I paid $1000 extra for a Mac instead of buying a PC :)

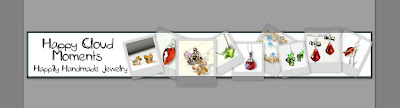
Here's the one I made for my jewelry shop. I picked red, green and gold items for the holiday season.

I hope this tutorial is helpful! Please send me banners you've made so I can show if off here. Once I get a few, I will post them up along with a little intro about your shop. Feel free to explore the other options like no shadow or regular border or a different color background. Have fun with it!


16 comments:
Thanks so much Joyce, I'll work on one this weekend and send it when it's done :)
Oh wow-that's really neat.Thanks for the tutorial:)
Thanks! I just added mine to my store: campcupcakedesigns.etsy.com :)I feel alot more prepared to start selling! Seriously- thank you!!
Hi, I can't seem to get my banner to stay set at 760 x 100. It's much larger, and when I try to edit it (I'm using Office Picture Manager), it compresses to small:( It's so cute too, but it just won't save right!
Patrice, did you export from Picasa to 760 pixels? It's step 9 in the tutorial. I never used Office Picture Manager, so I am not sure how to edit it from there.
Hi Joyce,
I did export to 760 but for some reason once it's saved, it's much larger. I'll keep playing with it. I'm determined to get it right!
LOVE it! I totally just bookmarked this!
Wow..thanks for such a great Tutorial !
I'm loving this idea! I just made one for my shop! THANK YOU!
Very nicely done. Maybe you can do a side business of doing business design work.
Thanks so much! I'm using this for my new shops banner!
I followed your tutorial too it was so easy! Thank you so much, it made my shop look a little more professional!
www.carolinasoapco.etsy.com
Thanks again! :-)
Thank you so much! It was easy and fast and now people can see what is in my shop!!
Great Tutorial..not working for me, but I'll try..think I need Intel.
Thank you soooo much for the tutorial. The only problem I am having is when I try to put the pictures in the frame they go behind it. Any suggestions??
Hello Sarah,
You will need to right click on the "frame" image. When the menu shows up, there should be one that says "move to bottom". Click on that and it will go beneath all the other pictures.
Post a Comment