Showing posts with label craft. Show all posts

Friday, May 6, 2011

~ Plumeria Madness and Other New Items at Happy Cloud Supplies ~

I love plumerias.  They are so simple and pretty.  I even wanted to use them for my wedding bouquet.  But, I couldn't and now I must make up for it by purchasing large quantities of plumeria beads.  I am just kidding.  I have quite a few requests for these in different colors so I ordered some.  I hope people will like them!  I have now 8 colors in stock.

 I think my favorite ones are light blue and gray.  I know you are surprised that it's not the yellow ones but I don't care for the orange that much.

I also got some mini plumeria beads.  They are better for earrings necklaces and bracelets.  Also great for hair pins.

I may have to take pictures of these again.  It's like a neon pink and it's so hard to capture!

I also got 2 new bells.  Here are the hamsters...


And rubber duckies!  Ok, they are not rubber, but they look like rubber duckies!


And here are some random stuff I picked up. I think these beads are cool! Very pretty and exotic.


I got more big lobster claws for key chains.  These are pretty awesome as purse charms too.

These are super cute too!  Perfect for the summer!

I will be listing these slowly over the next few days.  Please be sure to visit Happy Cloud Supplies to see all the great charms and beads available now!

Friday, October 15, 2010

~ Swarovski Crystal and Polymer Clay Doll Head Figurine Tutorial ~

When I first saw these little figurines, I wanted one in every color!  They are so dang cute!  I sell these in my jewelry shop and I also sell the polymer clay doll head beads in my supplies shop.  For those of you who are crafty and wants one of these, read on and then get the beads from my shop!

There are 2 parts to this figurine:  body and legs.  Legs are optional and can be done with chain or eye pins.  It's very simple so I am going to leave that to you.  Here's what you need for the body
8- 3mm bicones (5301 or 5328)
2- 5mm bicones (5301 or 5328)
6- 6mm rivolis (6200)
6- 8mm rivolis (6200)
1- Polymer clay doll head bead
1- 3.5 inch eyepin, 22 gauge or 20 gauge
1- Non-elastic cord.  0.4mm is a good size.  


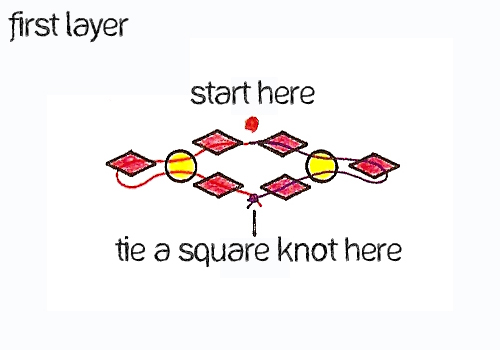
Step 1:  Create the 3 layers by stringing the crystals as shown in these diagrams.

Step 2:  Attach the legs to the eye pin.  You can use chains and dangle small beads at the end or eye pins or whatever you feel like.  You want to attach the legs first because it may be hard to attach them after you put the rest of the beads on the eye pin.

Step 3:  Put the layers on the eye pin as shown in the diagram.  Finish by carefully forming a simple loop above the polymer clay head bead.

Step 4:  Attach this charm to whatever you want.  Use it as a cute pendant or add it to a cute phone strap.

Easy right?  I hope you enjoy this tutorial!  Please let me know if you have any questions or have trouble finding the supplies.  I will be posting another tutorial soon!

Friday, May 21, 2010

~ Feature Friday: Allie's Minis ~

This week has been pretty crazy and haven't been able to blog! I had a deadline for work, had to prepare for a trip and found a new addiction. I'll post about the new addiction later. Let's get back into the groove with this week's Friday Feature! This week, I found another cute little miniature shop, Allie's Minis! Allie is a second grade teacher and a miniature food artist from Chicago. You all know how much I love Chicago :)


Everything you see in Allie's Minis is handmade by Allie using polymer clay. She has dollhouse minis like cakes and other kinds of food. Look how cute these cakes are!!! I love them!


Everything is so detailed. Look at the slices of bananas, strawberries and kiwis on this fruit tart. I think the bananas look very real!


She has other food items too like this yummy Turkey Dinner. I love how she gives you size reference with coins and do it so inconspicuously. Most of the time, I think coins make pictures look tacky, but she does it so well! You hardly notice the coin there.


Of course she has my favorite sushi too! Just imagine rolling the polymer clay into little balls for the masago! This takes a lot of patience.


She also makes charms and earrings. I know you want these cute slices of carrot cake on your ears!


She has 9 items in her sales section right now. These are a great deal! Get them before they are gone!


Allie has a wonderful blog too! Don't forget to follow her if you want to keep up with her miniature food making adventures. I hope you like her shop as much as I do. Don't forget to click on the pictures to get to the listings or her shop. And of course, don't forget to comment here to show her your love!


~ Do you want to be featured? Leave a comment here and I will take a look at your shop. I will pick one to be featured every Friday! ~

Thursday, April 1, 2010

~ Printsess for Custom Charms and More~

I stumbled upon the cutest printing service site today. It's called Printsess. It took me a while to get it, but I got it. I think. It's supposed to be like "Princess" right? Anyway, look at the kind of cute stuff they make. Basically, you upload your artwork and they can make it into acrylic charms, posters, prints, stickers and even metal charms!


I am very tempted to make some acrylic charms. Look at these cute little clouds they show as an example! I am itching to bust out my sketch books to design something. You can make 1 inch, 1.5 inches or 2 inch charms. It's 125 for 100 inch charms.


You can make sticker sets too. Look how cute! These look so professional, like stuff I can get at the stores.


I am also interested in the metal charms. You know how I love charms! These are made out of silver tone nickel. It's more expensive though, 100 for $350.


My brain is exploding with ideas now! What would you make?

Sunday, June 28, 2009

~ DIY Ribbon Organizer ~

I recently got a bunch of ribbons to package my precious jewelry for my Etsy shop. My dad saw the rolls of ribbons scattered on my craft table and said, "I got something for you!" and grabbed all my ribbons and disappeared into his "lab". A half an hour later...


Isn't my dad awesome??? So basically, he took one of the bamboo sticks that we have to prop up our tomatoes and other plants in the hard (available at Walmart/Home Depot), cut it in half and attached it to a wheel. Then, attach a rubber band to hold everything in. Just awesome.


You may be wondering....wheel?!?! Yes, it is a wheel.


It's from my brother's ab slider roller. I think he used it twice. He probably forgot he even got this thing. My dad even used the blue cover for something else, but I will save that for another post. Can you guess what he made with the round cover?


This ribbon organizer is awesome. I just take it out, hold it with one hand and pull on the ribbon I want with the other hand. For a casual ribbon user like myself, this is perfect. An avid ribbon user may want to have this hang horizontally somewhere so she doesn't have to hold it.

In summary, total cost of this ribbon organizer is less than a dollar if you want to count the bamboo stick and rubber band. And it took only 30 mins to make! You can use other stuff as base I guess. I think you can also use blank CD holders as is to hold the ribbons. I can even imagine installing a toilet paper holder or a paper towel holder in your craft rooms for your ribbons. What do you use to organize your ribbons?
Blog Widget by LinkWithin